Highlight
Where to paint: Sand-coloured clothing, wraps and cloak
Ushabti Bonecitadel · 22-32
Build Ushabti Bone on the upward-facing folds, widening the highlight near the shoulders and narrowing it as the cloth turns down.
Expected result
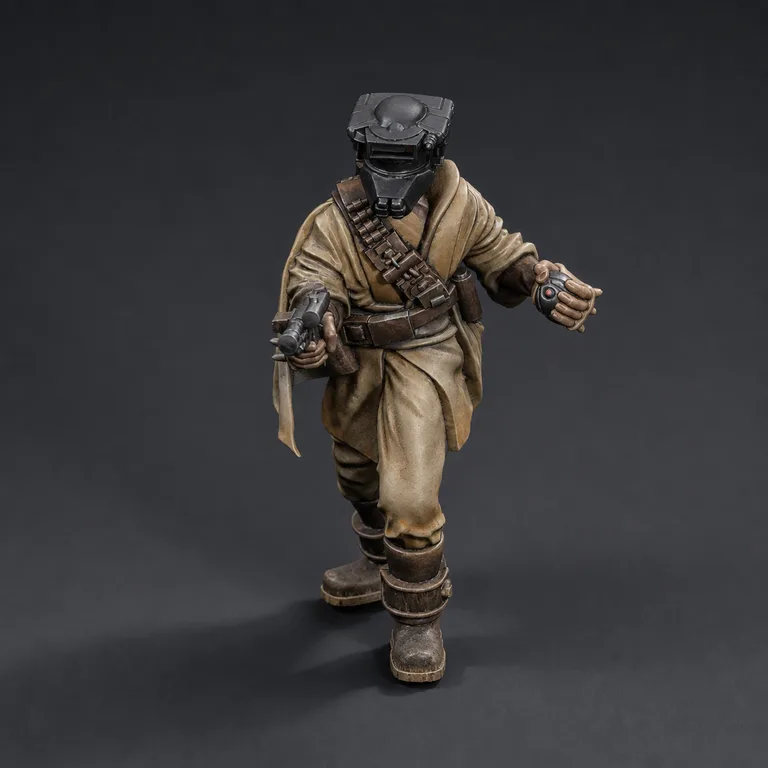
The cloth volume is readable from the front, while Zandri Dust remains visible as the middle tone between light and shade.
Points to watch
Do not trace every fold with the same-width stripe; the light should broaden and fade with the form.
Highlight
Where to paint: Helmet, visor, gloves, boots and leather gear
Eshin Greycitadel · 22-51
Feather Eshin Grey onto the upward-facing black panels, keeping the transition broad on the dome and tighter around the mask.
Expected result
The helmet has a soft top light and still falls to near-black around the visor and lower mask.
Points to watch
Do not brighten the underside of the snout or the recesses between plates.
Edge highlight
Where to paint: Helmet, visor, gloves, boots and leather gear
Draw a fine Dawnstone line along the edges that face upward, breaking it at panel joints instead of circling the whole helmet.
Expected result
The helmet construction is crisp from viewing distance, with the visor remaining the darkest feature.
Points to watch
Keep the line thin at the cheek plates and leave downward-facing edges dark.
Highlight
Where to paint: Helmet, visor, gloves, boots and leather gear
Ushabti Bonecitadel · 22-32
Layer Ushabti Bone sparingly over the worn leather edges, widening it on the knuckles and narrowing it along the straps.
Expected result
The leather catches warm light on its raised edges while XV-88 remains visible across most of each piece.
Points to watch
Do not turn every seam ivory or make the old leather as bright as the robe.
Highlight
Where to paint: Compact blaster, thermal detonator and base
Run Silver along the upper barrel and receiver, then place a curved reflection across the detonator's top arc. Keep Gunmetal Grey visible on every lower face.
Expected result
The blaster has one coherent upper reflection and the round detonator reads as curved metal rather than a flat disc.
Points to watch
Do not ring the entire detonator with Silver or brighten the underside of the barrel to the same value.
Highlight
Where to paint: Compact blaster, thermal detonator and base
Evil Sunz Scarletcitadel · 22-05
Add Evil Sunz Scarlet to the upper half of both red inserts with a single controlled touch, following the curve of the detonator control.
Expected result
Each red insert has a visible bright top and darker lower rim despite its small size.
Points to watch
Do not cover the entire Mephiston Red base or turn the controls into oversized orange spots.
Edge highlight
Where to paint: Compact blaster, thermal detonator and base
Wild Rider Redcitadel · 22-06
Touch Wild Rider Red onto the upper rim and the two sharpest corners, keeping the line shorter than the Evil Sunz Scarlet patch beneath it.
Expected result
The controls catch a fine warm-red edge without losing the darker red body or metal border.
Points to watch
Do not outline all four sides or let Wild Rider Red cross onto the surrounding steel.
Edge highlight
Where to paint: Compact blaster, thermal detonator and base
Neutral Greyvallejo · 70.992
Pick the raised black fittings with short Neutral Grey strokes, following the grip ribs and stopping before the polished metal planes.
Expected result
The grip and dark fittings are readable as separate components but remain quieter than the steel reflections and red controls.
Points to watch
Do not draw continuous grey outlines around the weapon or brighten the deepest joins inside the hand.
Final point highlight
Where to paint: Sand-coloured clothing, wraps and cloak
Screaming Skullcitadel · 22-33
Touch Screaming Skull onto short sections of those creases, concentrating the brightest cloth marks around the head and raised arms.
Expected result
A few crisp bone-coloured accents lead the eye to the upper body without outlining the entire garment.
Points to watch
Leave the lower cloak quieter; too many bright marks there will flatten the lighting hierarchy.
Final point highlight
Where to paint: Sand-coloured clothing, wraps and cloak
Add two or three pinprick White reflections where the strongest overhead light catches a hard fold.
Expected result
The white is visible only at the focal folds and does not replace the broader Screaming Skull highlight.
Points to watch
Do not dot the hem, gaiters or every raised crease with white.
Final point highlight
Where to paint: Helmet, visor, gloves, boots and leather gear
Administratum Greycitadel · 22-50
Place tiny Administratum Grey catches on these hard points, aligning them with the same overhead light used on the dome.
Expected result
A handful of sharp grey sparks finishes the helmet without turning its charcoal panels pale.
Points to watch
Do not repeat the point highlight on every rivet or along the full visor frame.
Final point highlight
Where to paint: Compact blaster, thermal detonator and base
Place tiny White glints on these few peaks. Keep the metal marks pin-sharp and make the red-control reflections smaller still.
Expected result
A handful of crisp points define the weapon's sharpest edges and make both controls look glossy without whitening the whole assembly.
Points to watch
Do not scatter white dots along the barrel, around the full detonator rim or across the fingers.

 Boushh Bounty Huntress — Compact Blaster→
Comments …
Loading comments…